Nginx proxy with rate limit

Tags

,

Basics

Nginx proxy is very popular against direct application exposure. Besides it has a handy request rate limit functionality that can be done through limit_req_zone & limit_req config items as;

Experiment

Lets have a simple experiment setup to test this configuration. As a web server, prepare a dummy http request handler working at port 8080

package main

import (
"fmt"
"log"
"net/http"
)

func requestHandler(res http.ResponseWriter, req *http.Request) {
fmt.Fprint(res, "Everything's Gonna Be Alright!")
}

func main() {
// register requestHandler to incoming requests for "/"
http.HandleFunc("/", requestHandler)

// run http server on the port 8080
log.Fatal(http.ListenAndServe(":8080", nil))
}

Then use a nginx proxy in front with the config

events {
}

http {
limit_req_zone $binary_remote_addr zone=webSrv:10m rate=5r/s;
server {
listen 80;
location / {
limit_req zone=webSrv burst=10 nodelay;
proxy_pass http://web-srv:8080;
}
}
}

A docker compose file will be sufficient to have orchestration. Notice that containers using the same network namespace can use container names as resource url like http://web-srv:8080,  that is used in the proxy config above.

version: '3'
services:
proxy:
image: nginx:latest
container_name: proxy-srv
volumes:
- ./proxy/nginx.conf:/etc/nginx/nginx.conf:ro
ports:
- 9090:80
networks:
- proxy-net
- web-net

web:
image: loadtest-web:latest
container_name: web-srv
expose:
- "8080"
networks:
- web-net

networks:
proxy-net:
web-net:

We can use the docker compose file to spin up our experiment setup

We should see that we have two containers running with correct network settings 


Then we can write a basic script to test rate limit functionality.

From the nginx logs we will see that first 11 requests will be successful, but the remaining ones mostly fail with 503

References

a good nginx reverse proxy tutorial

nginx rate limiting

Some ear candies from Scott Bradlee’s PMJ to boost mood

Robyn Adele Anderson singing Bluegrass Barn Dance of Robin Thicke


Morgan James singing Dream On of Aerosmith


Hannah Gill & Casey Abrams singing Crazy of Gnarls Barkley


Mandy Gonzalez & Tony DeSare singing Despacito


Olivia Kuper Harris singing Life On Mars of David Bowie


Brielle Von Hugel singing Genie in a Bottle of Christina Aguilera


Miche Braden singing Sweet Child O’ Mine of Guns N’ Roses


Sara Niemietz singing I Want You To Want Me

docker0 looses its ip address

Tags

,

When there is no explicitly specified preference, default bridge will be used in container networking. In this configuration, docker will create a bridge in host, and guest  running in bridge mode would have an interface connected to this bridge. Therefore they would have an isolated network inside the host. Container in the same host can talk with each other through this bridge, and default route in host will enable the container to reach outside.

single-host-bridge

Recently I tried setting docker in a laptop having a wireless interface and faced with an issue that docker0 looses its ip address consistently.

Lets startv with trying docker system restart

sudo systemctl restart docker.service

docker0-ip-failure-restart-docker-service

docker0-ip-failure-docker0-with-ip

Good. docker0 interface gets ip after decker service restart. However, we see that it looses again after the running container exists.

docker0-ip-failure-docker0-without-ip

We can have a look to syslogs.

docker0-ip-failure-var-log-syslog

Here we see some logs during container exit, around wicd that seems strange. Lets look where docker0 is configured in wicd configuration.

sifa@sifa:/etc$ sudo grep -r docker0 ./
./wicd/manager-settings.conf:wired_interface = docker0

sifa@sifa:/etc$ sudo head wicd/manager-settings.conf
[Settings]
backend = external
wireless_interface = None
wired_interface = docker0
wpa_driver = wext
always_show_wired_interface = False
use_global_dns = False
global_dns_1 = None
global_dns_2 = None
global_dns_3 = None

After removing docker0 from wicd configuration (replacing it with eth0) and restarting wicd and docker services, the problem is finally fixed.

sudo systemctl restart wicd.service
sudo systemctl restart docker.service

docker0-ip-failure-successful-ping-inside-container

Container Networking Basics

Tags

, ,


single-host-container-networking

What is a container?

Linux containers are normal processes that are using namespace & cgroup features of kernel. With these, containers are able to have isolated namespaces and resource limits. By default, docker creates a set of hostname, process ids, file system, network interfaces and ipc stack for the container that is running.

container-namespaces

Containers, specified by Open Containers Initiative, run on an host operating system and get low level networking primitives through host OS. 

Some basics and running a test container

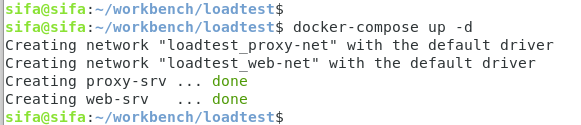
Before starting to dive deep, lets have a setup. The basic docker objects are images, containers, networks and volumes. The docker system prune -a command will help removing all stopped containers, dangling images, images without a running container and unused networks, and provide somewhat clean environment.

docker system prune -a

docker-system-prune

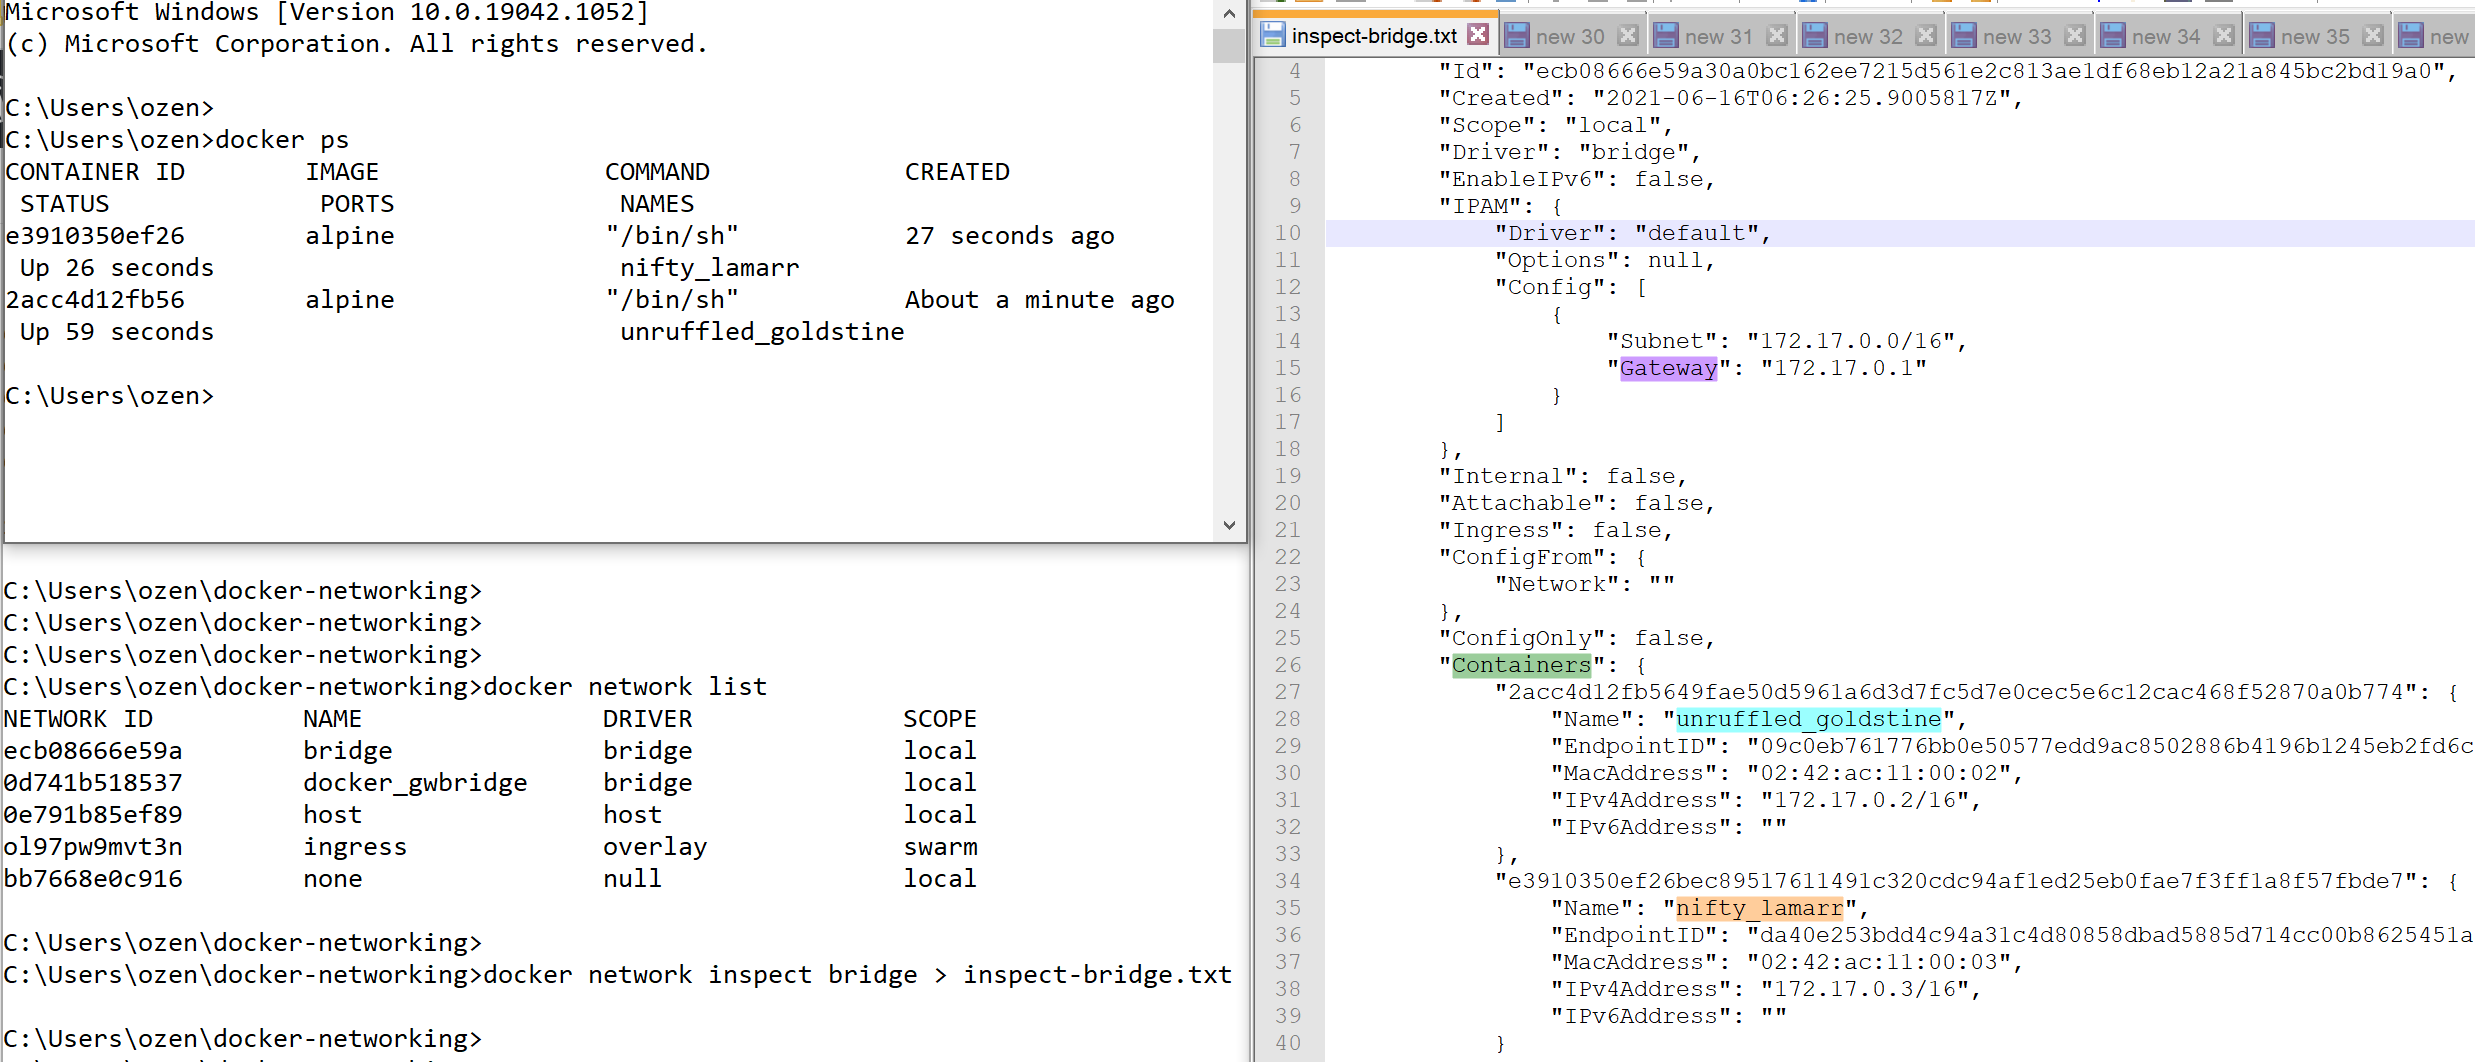
docker inspect will provide information about a docker resource. Lets inspect an handy alpine image.

docker pull alpine:latest
docker inspect alpine:latest > alpine-inspect.txt

docker-pulling-an-image

Resulting alpine-inspect.txt will be similar to

docker-image-configs

Here we see two configurations, ContainerConfig & Config. What is the difference? Config contains the image’s information. Besides, ContainerConfig shows the details of the container that was used to build the last layer of the image. The new container that will be created from the image with docker run\create will apply the data of Config.

Good. For alpine container, entrance will be through “Cmd”: [“/bin/sh”] & “Entrypoint”: null. There is a good article for Cmd & Entrypoint difference. As a summary, CMD defines default commands and parameters (or if an ENTRYPOINT is present, parameters that would be added) for a container. CMD is an instruction that is best to use if you need a default command which users can easily override.  ENTRYPOINT is preferred when you want to define a container with a specific executable. You can override an ENTRYPOINT when starting a container with the –entrypoint flag.

For alpine, there is no ENTRYPOINT but CMD of “/bin/sh”, which makes sense as being a base image. Lets do something and try to get network interfaces of alpine.

we can override the default command and get the network interfaces through

docker run alpine ip add

docker-ip-addr

or use the default CMD and attach to the shell with -it option

docker run -it alpine

docker-run-default-command

Now, a question may arise about eth0, what is it and where does it come from?

Single Host Containers – bridge networking

In the previous section, we run a single host alpine container. Since we did not specified a network preference, default bridge network is used. In this configuration, docker will create a bridge in host, and guest  running in bridge mode would have an interface connected to this bridge. Therefore they would have an isolated network inside the host. Container in the same host can talk with each other through this bridge, and default route in host will enable the container to reach outside.

single-host-bridge

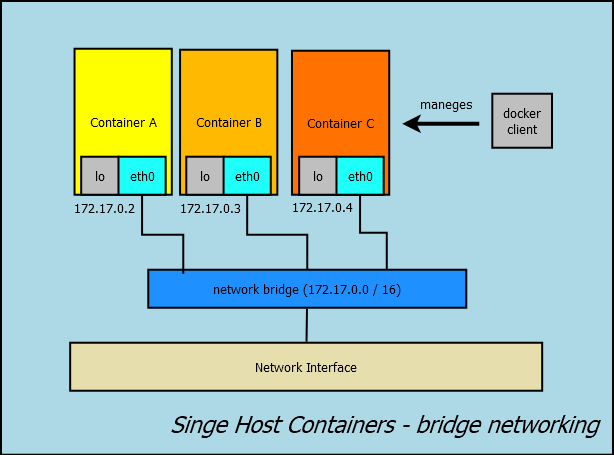
Lets start two alpine containers and have a look

docker run --net=bridge -it alpine

we see that containers take ip from 172.17.0.0/16 range, and can ping each other.

docker-singe-host-bridge-ping

Looking at the host network resources, we see that there is a bridge that connects these container interfaces.

docker network list
docker network inspect bridge

docker-singe-host-bridge-network-resource

Single Host Containers – host networking

When we do not want to isolate the guest containers but actually use the network namespace of the host, –net=host can be used to switch into host networking mode. Guest container will share network resources whatever host already have, much like any other process running in the host.

single-host-host-networking

docker run –net=host -it alpine

singe-host-host-network

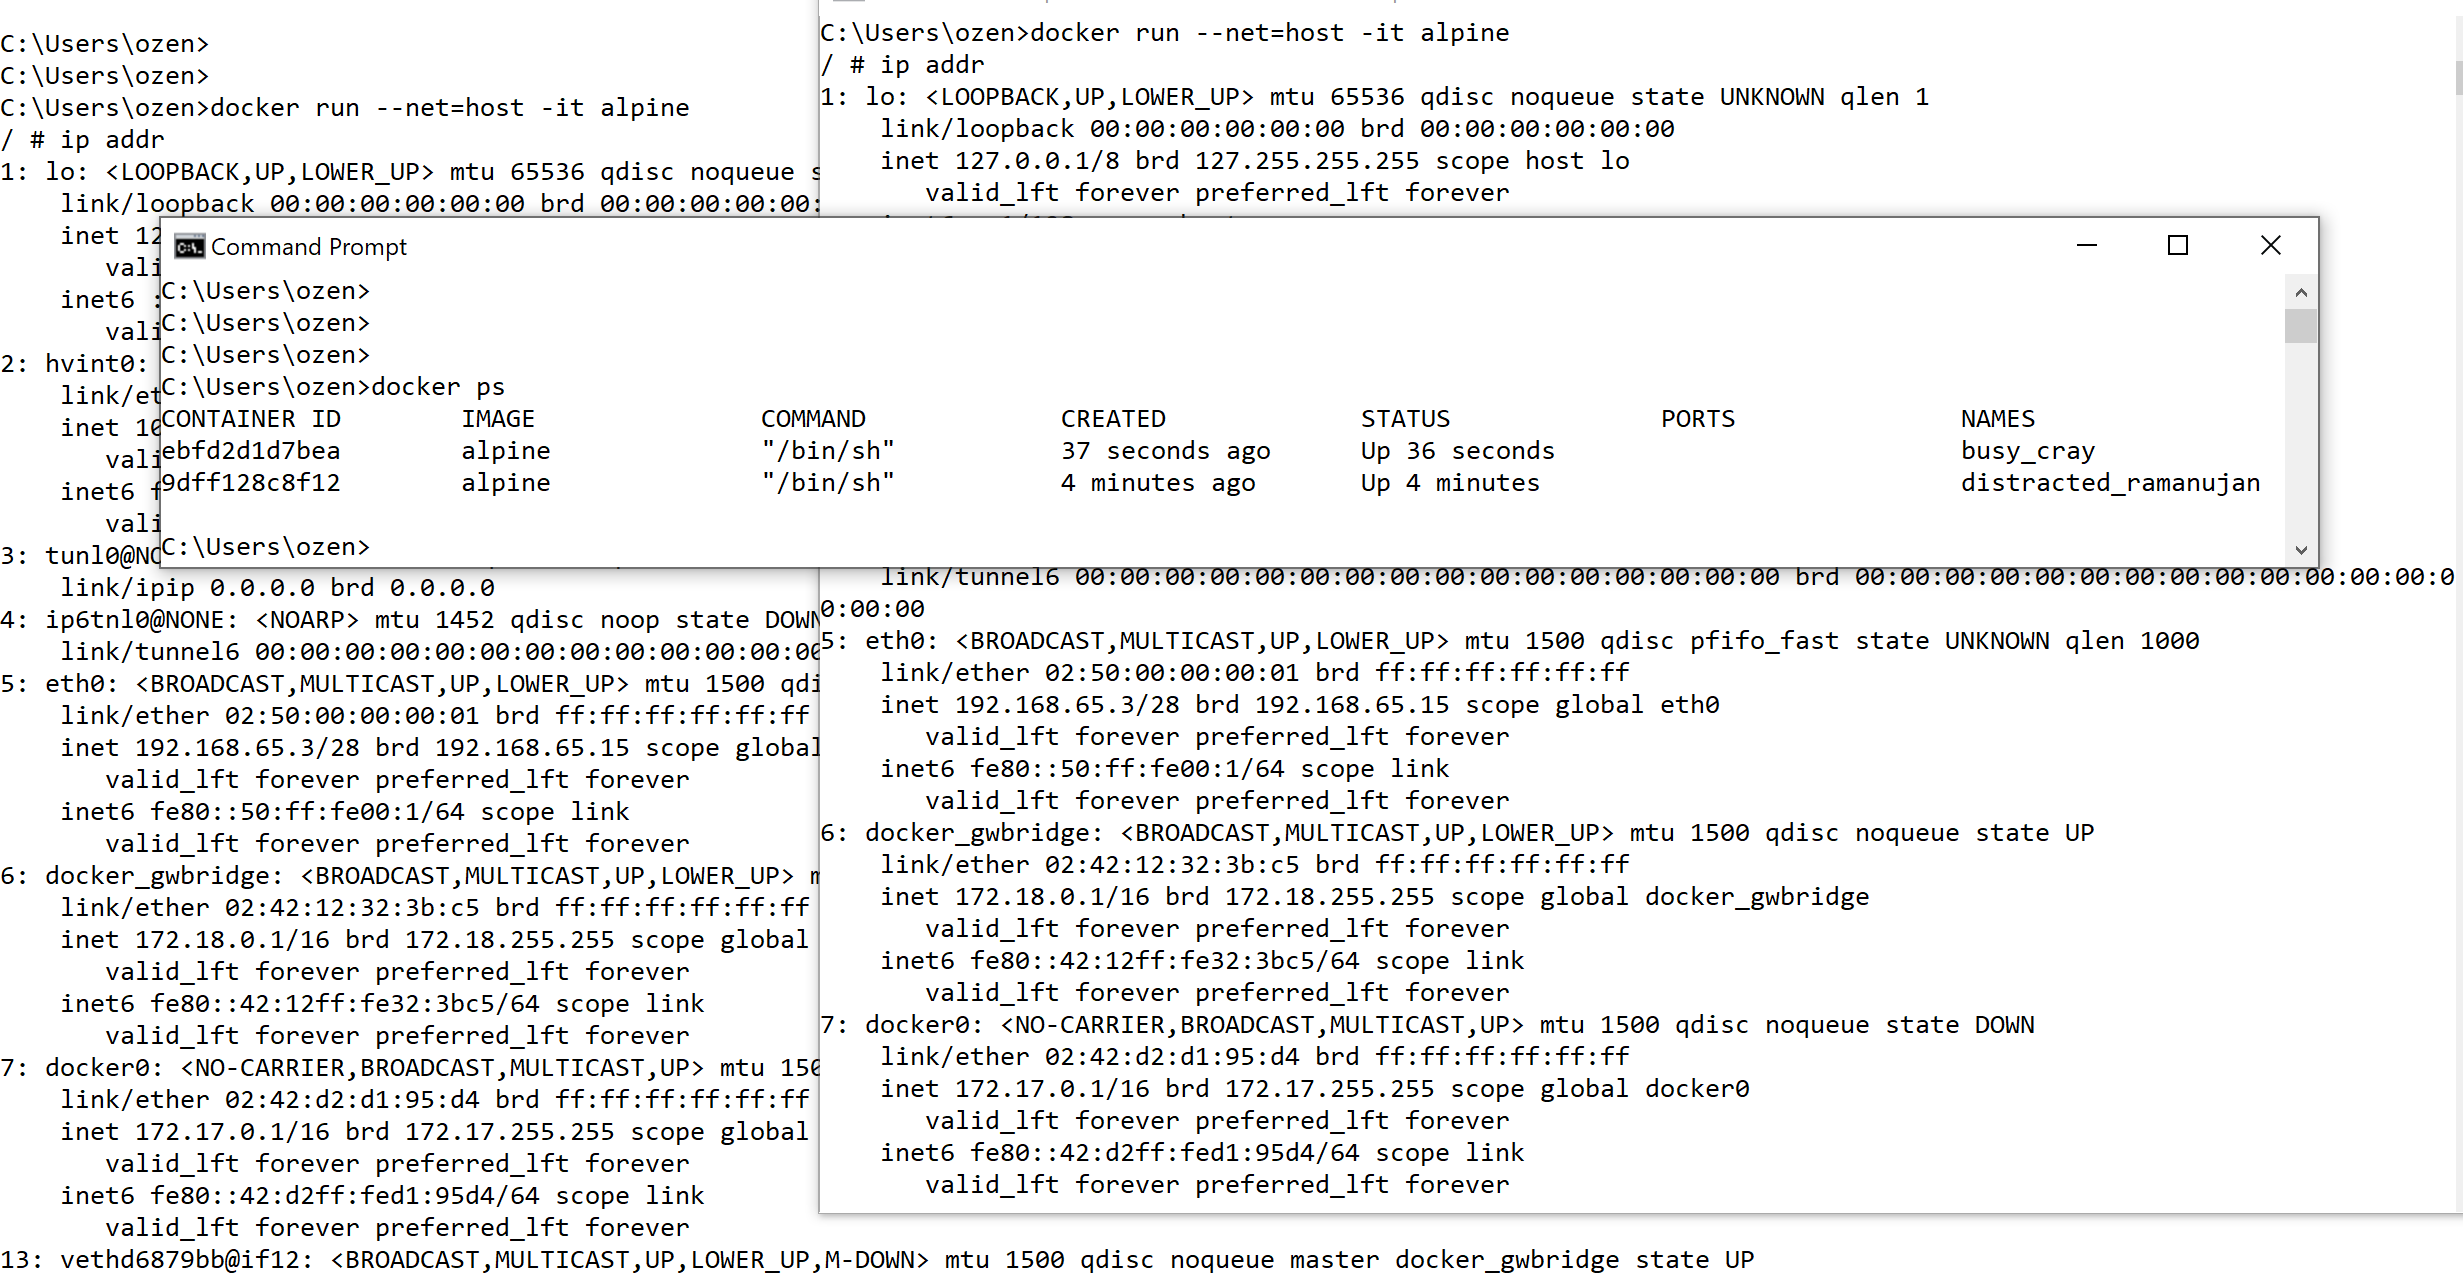
This mode has the advantage of removing redirection and increasing network speed. The disadvantage is, it increases attack surface with using host network namespace.

Single Host Containers – container networking

Container networking enables network namespace sharing between containers without touching host. Kubernetes uses this mode for containers in the pod.

single host-container-networking

Assuming we have a container ,

docker run --name=base --net=bridge -it alpine

we can start another container with the same network namespace of an already existing one

docker run --net=container:base -t alpine

singe-host-container-network

resulting bridge network will contain one container entry as expected

singe-host-container-network-inspection

Similar to using a peer containers network namespace, we can share its ipc or pid space as well, like

docker run --name alpine --net=container:nginx --ipc=container:nginx --pid=container:nginx -it alpine


Single Host Containers – no networking

This mode makes containers have their own namespace, isolated by default. This is the use case when no network communication is needed. Besides, it allows custom network setup, if needed.

single-host-no-networking

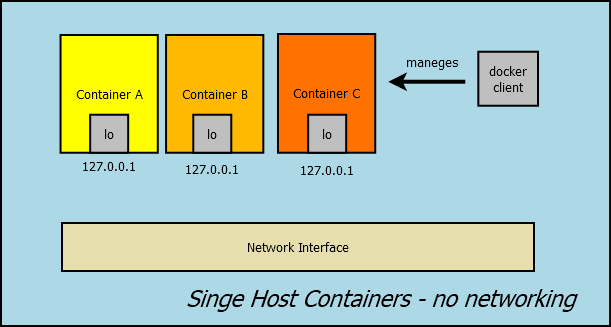
docker run --net=none -it alpine

As a result, he container will only have loopback

singe-host-no-network

Network Security- icc / ip_forward / iptables

By default, inter-container communication is enabled (–icc=true), allowing containers to talk with each other without any restrictions. Moreover, –ip_forward and –iptables flags tune communication between containers and the environment. 

Multi Host Containers

For multi host containers, assigning IP addresses to containers is a problem to solve. It can be solved through Overlay Networks, where an orthogonal, practically hidden networking layer is spawned, distributed over different hosts. docker_gwbridge & ingress network resources perform overlaying.

docker-multihost-overlay-network

Besides, with Linux kernel version 3.19 IPVLAN feature is introduced. Each container of the host gets a unique and routable IP address.  IPVLAN takes a single network interface and creates multiple virtual network interfaces with different MAC addresses assigned to them, which can be used in containers.


Container Network Interface

CNI is a plugin based networking specification and library suite for Linux containers. Using its config file CNI uses plugins to add or remove containers from network. For CNI internals, there is an excellent blog post from Langemak.

cni-plugin


Kubernetes Networking

Kubernetes networking primitives are;

  • Containers can communicate with all other containers without network address translation.
  • Nodes can communicate with all containers (and vice versa) without network address translation.
  • The IP a container is same for himself and others.
  • Containers of the same pod share the same network namespace, so can talk with each other on localhost.
  • Pods should have an IP address of a flat networking namespace with connection to other nodes and pods.
  • External traffic can be routed to pods through ingress, pods can reach external APIs through egress rules.

When the pod is spinned, an infrastructure container (pause container) ramps up in bridge mode that will get the pods ip and create network namespace. All other containers are initialized with container networking with this infrastructure container to share the same network namespace. As the containers share the same port range, it is developers responsibility to avoid collusions.

Kubernetes Pods have routable ip which can be used inter pod communication, however, as pods are ephemeral, it is better to use service ips, that are stable and can be resolved through DNS.

Kubernetes uses flat ip space, whereas docker containers have ip in the range 172.x.x.x range. If the container connect to any other one, the observed ip address will be different. For this reason (since self seen ip and observed ip is different), docker containers can not self register themselves to any service. 

Pod declarations allow specifying the containers and Kubernetes automates setting up corresponding namespaces and cgroups. Pod containers will use their own cgroups but may share hostname, pid, network and ipc spaces. For example,

Start with a base container that will initialize namespaces

docker run -d --name base -p 8080:80 gcr.io/google_containers/pause-amd64:3.0

then share this base containers network, pid and ipc namespaces as

docker run --name alpine --net=container:base --ipc=container:base --pid=container:base -it alpine

With this setup, each container thinks that they are running on the same machine. They can talk to each other on localhost, they can use shared volumes and they can use IPC or send each other signals like HUP or TERM.

Usual parent and keep alive container of a pod that initialize network and other resources is “pause” container. Other containers of the pod shares the same network namespace. when we look at running containers of a kubernetes node, we will see many “pause” containers that are hidden.

minikube-pause-container

Pause container assumes the role of PID 1 and will reap any zombies by calling wait on them when they are orphaned by their parent processes. The code is surprisingly simple;

/*
Copyright 2016 The Kubernetes Authors.
Licensed under the Apache License, Version 2.0 (the "License");
you may not use this file except in compliance with the License.
You may obtain a copy of the License at
    http://www.apache.org/licenses/LICENSE-2.0
Unless required by applicable law or agreed to in writing, software
distributed under the License is distributed on an "AS IS" BASIS,
WITHOUT WARRANTIES OR CONDITIONS OF ANY KIND, either express or implied.
See the License for the specific language governing permissions and
limitations under the License.
*/

#include <signal.h>
#include <stdio.h>
#include <stdlib.h>
#include <sys/types.h>
#include <sys/wait.h>
#include <unistd.h>

static void sigdown(int signo) {
  psignal(signo, "Shutting down, got signal");
  exit(0);
}

static void sigreap(int signo) {
  while (waitpid(-1, NULL, WNOHANG) > 0);
}

int main() {
  if (getpid() != 1)
    /* Not an error because pause sees use outside of infra containers. */
    fprintf(stderr, "Warning: pause should be the first process\n");

  if (sigaction(SIGINT, &(struct sigaction){.sa_handler = sigdown}, NULL) < 0)
    return 1;
  if (sigaction(SIGTERM, &(struct sigaction){.sa_handler = sigdown}, NULL) < 0)
    return 2;
  if (sigaction(SIGCHLD, &(struct sigaction){.sa_handler = sigreap,
                                             .sa_flags = SA_NOCLDSTOP},
                NULL) < 0)
    return 3;

  for (;;)
    pause();
  fprintf(stderr, "Error: infinite loop terminated\n");
  return 42;
}


But how can we achieve this namespace sharing?

In Linux new process inherits namespaces from the parent process. The way to have own namespaces is through unshare system call. An example of a ramping a shell in new PID, UTS, IPC, and mount namespaces is through

sudo unshare --pid --uts --ipc --mount -f chroot rootfs /bin/sh

The new processes can be added to previous namespace through setns system call.

Process creation

A sample process creation is through fork(), that creates a copy of the parent process, and exec() that changes the executable. Linux threads are lightweight processes, that differ in memory allocation, as they share text, data and heap. Usually programming languages will provide a wrapper function to ease these. Each process will have its entry in the process table that also keeps the process state and exit code. After a child process finishes running, its process table entry remains intact till parent queries its exit code through wait() syscall. What happens if parent does not wait(), or crashes in between? In this case, the child may become zombie. Zombie processes are the ones that have stopped running but their process table entry still exists because the parent did not wait() ed or there is no running parent at all.
When a process’s parent dies before the child, kernel assigns the child process to the “init” process (process with PID 1). The init process becomes the parent meaning that it should wait() the adopted process to get its exit code to avoid it become a zombie.

With Docker, each container usually has its own PID namespace and the ENTRYPOINT process is the init process, and expected to handle this responsibility. Luckly, If the container is not a general purpose base container it wont have forks() and this wont be problem.


References

Container networking from Docker to Kubernetes

What are Kubernetes Pods Anyway?

The Almighty Pause Container


AWS Solutions Architect Professional – study notes for S3

Tags

,

S3 fundamentals are;

  • object storage
  • accessible by http
  • highly available & durable
  • 0-5TB object size, max 5GB PUT size and we can use multipart put for larger objects
  • multiple storage classes and encryption options
  • versioning and lifecycle management
  • access control
  • tight integration

Security and access

  • Bucket & Object ACL applied to S3resources
  • Bucket Policy applied to S3 resources (AWS recommends)
  • IAM Policy for applied to user and roles (AWS recommends)

Customer Requirement: restrict access to a resource except a group

We have a bucket with sensitive data and want to guarantee that only EC2 instances in a specific ASG can reach them. We can have a Deny except rule in bucket policy. Then either we should give access to specific asg with bucket  policy or IAM.

A. An explicit DENY for resources arn:aws:s3:::my_bucket & my_bucket/* except aws:userId [the group that should access]
B. 1. An Allow for arn:aws:iam:123456789:role/MyRole to resources arn:aws:s3:::my_bucket & my_bucket/*
B. 2. Allow rule in IAM

Customer requirement: store sensitive data and guarantee that data is encrypted in transit and at rest

Http is unencrypted, https is encrypted. By using bucket policies we can be sure that http is unused with explicit DENY to aws:SecureTransport: false conditional. Anything is denied in this bucket if the secureTransport is false.

Encryption at rest can be applied with KMS. We can use default AWS managed key (AES256) or customer managed keys (aws:kms) . Two ways to enforce encryption at rest is through bucket policies & default encryption. In Bucket policy

Do an explicit DENY on s3:PutObject for conditional s3:x-amz-server-side-encryption: true is not sent.

Alternatively, any object that is not unencrypted will be encrypted through either AES256, or KMS( asw/s3, ca-key or Custom KMS ARN). The two options are not compatible. If we specify that the user should choose a key in policy, default setting does not work. User should not specify the encryption method, and default encryption would work.

Cost of S3 are due to

  • storage
  • requests
  • data transfer

Traffic from S3 to CloudFront is free. It is cheaper to request from CloudFront that access S3 directly.

S3 Consistency model

Amazon S3 provides read-after-write consistency for PUTs of new objects in your S3 bucket in all Regions, with one caveat. The caveat is that if you make a HEAD or GET request to a key name before the object is created, then create the object shortly after that, a subsequent GET might not return the object due to eventual consistency.

For existing objects, Amazon S3 offers eventual consistency for overwrite PUTS and DELETES in all Regions.

S3 replication

Amazon S3  features asynchronous replication to another bucket – optionally in another account or region. This is good if

  • safely sharing data
  • backup purposes
  • log aggregation
  • latency reduction

S3 replication uses an IAM role that needs read access to the source bucket and write access to the target bucket (and KMS keys, when used) Versioning needs to be enabled in source and destination buckets. The entire source bucket or a selection of objects (based on prefix or tags) can be replicated.

Encrypted objects are not replicated by default (you have to check it). During replication the storage class can be changed. Optionally the permissions to the replicated objects can be extended to the target bucket owner.

Default, when an IAM user or role writes an object, the object owner is the IAM user, so objects are owned by the users that put them. The bucket may still be owned by another IAM, but the object is owned by who put them. This can be soled by

  1. When user B uploads the file, he can set –acl bucket-owner-full-control full permissions for user A. the object is still owned by user B, but userA has full control.
  2. User B assumes IAM user or role of A, and uploads the file with the assumed role, so the object is owned by user A

This can be enforced by bucket policies. If this user tries to put object without “bucket-owner-full-control”, he will not be allowed.

"Id": "Policy154691"
"Version": "2012-10-17"
"Statement":
  - "Sid": "Stmt154275"
    "Action": 
      - "s3:PutObject"
      - "s3:PutObjectAcl"
    "Effect": "Allow"
    "Resource": "arn:aws:s3::awsexamplebucket/*"
    "Condition":
      "StringEquals": 
        "s3:x-amz-acl": "bucket-owner-full-control"
    "Principal":
      "AWS":
        - "arn:aws:iam::111333:user/ExampleUser"

aws s3 cp dummyFileToCopy.dmy s3://other-users-bucket/ –acl bucket-owner-full-control

To look further

  • website hosting
  • cross origin resource sharing
  • s3 access points
  • s3 badge operations
  • s3 wans

Well architected framework / AWS s3 faq / AWS s3 documentation

References

AWS Well architected framework

S3 faq

S3 for AWS Solutions Architect

AWS Solutions Architect Professional – study notes for IAM

Tags

,

IAM is used any time you want to access a service like EC2, DynamoDB or S3. IAM building blocks are;

  • IAM User
  • IAM Role
  • IAM Group
  • IAM Policy

API / CLI access is through key & secret: AWS_ACCESS_KEY_ID & AWS_SECRET_ACCESS_KEY

"Version": "2012-10-17"
"Statement":
- "Effect": "Allow"
"Action": "*"
"Resource": "*"
aws iam list-users will give us user arn. 

Console access is through username / password with optional MFA

"Version": "2012-10-17"
"Statement":
- "Effect": "Allow"
"Action": "*"
"Resource": "*"
"Condition":
"Bool":
"aws:MultiFactorAuthPresent": "true"

Now we need to use AWS_ACCESS_KEY_ID & AWS_SECRET_ACCESS_KEY to get a session token (which has an expiration date) 

aws sts get-session-token –serial-number arn:aws:iam::007:mfa/AdminUser –token-code 007007

which will return AWS_SESSION_TOKEN and a new set of AWS_ACCESS_KEY_ID & AWS_SECRET_ACCESS_KEY. With these temporary credentials we can request,

aws iam list-users

Servers can be whitelisted through specifying their ip to whitelist

Console access is through username / password with optional MFA

"Version": "2012-10-17"
"Statement":
- "Effect": "Allow"
"Action": "s3:*Object"
"Resource": "*"
"Condition":
"IpAddress":
"aws:SourceIp":
- "1.2.3.4/32"

Now server with ip 1.2.3.4 can do anything to s3 objects on any resource

IAM Users

  • can have long lived credentials
  • can be external users and systems
  • may have optional security like mfa or conditions (mfa enabled & ip whitelisting)

It would be very bad idea to take AWS_ACCESS_KEY_ID & AWS_SECRET_ACCESS_KEY and store them in EC2 instance.

IAM Role

  • are used by native resources (EC2 instance, RDS instance, CodeBuild, CloudFormation)
  • resources assume role
  • role has policies attached

1. EC2 instance will assume an IAM role, IAM role has policy attached to it 

"Version": "2012-10-17"
"Statement":
- "Effect": "Allow"
"Action": "s3:*Object"
"Resource": "*"

2. IAM Role will return temporary credentials to EC2 instance

3. Then EC2 instance can use these temporary credentials to access resource (S3)

EC2 instance has security credentials automatically which are rotated every few hours.

curl http://169.254.169.254/latest/meta-data/identity-credentials/ec2/security-credentials/ec2-instance

aws sts get-caller-identity

IAM Role Trust Policies

Users can also have escalated priviledges through assume role.

An IAM user assumes IAM Role

"Version": "2012-10-17"
"Statement":
- "Effect": "Allow"
"Action": "sts:AssumeRole"
"Resource": "*"

which has Policy that allow access to bucket

"Version": "2012-10-17"
"Statement":
- "Effect": "Allow"
"Action":
- "s3:*"
"Resource":
- "arn:aws:s3:::my-bucket-iam"
- "arn:aws:s3:::my-bucket-iam/*"

IAM Role returns temporary credentials, where IAM user can access to corresponding S3

We are able to do that because the role has the following trust policy

"Version": "2012-10-17"
"Statement":
- "Effect": "Allow"
"Principal":
"AWS": "arn:aws:iam::007:root"
"Action": "sts:AssumeRole"
"Resource": "*"

any iam user or role in this account is allowed to use assume this role, so EC2 instance and IAM user are both allowed to assume this role. As comparison, the following policy only allows EC2 instances to assume the role

"Version": "2012-10-17"
"Statement":
- "Effect": "Allow"
"Principal":
"Service": "ec2.amazon.com"
"Action": "sts:AssumeRole"
"Resource": "*"

any IAM user will get access denied when they try

aws sts assume-role –role-arn arn:aws:iam:007:role/ec2-iam-ss-role –role-session-name elevated

IAM Role Trust Policy

  • defines who is trusted to assume the role
  • does not grant an explicit allow

IAM Federation

Used by OpenID Connect identity providers

  • facebook
  • google
  • twitter

Used by external directories with SAML 2.0

  • active directory

How it works

1. My device will login to amazon / facebook / twitter / active directory

2. My device will request AssumeRole WithWebIdentity from AWS STS. AWS sts that has policy

"Version": "2012-10-17"
"Statement":
- "Effect": "Allow"
"Action":
- "s3:*"
"Resource":
- "arn:aws:s3:::my-bucket-iam"
- "arn:aws:s3:::my-bucket-iam/*"

3. AWS STS will provide temporary credentials for the role. 

4. Now device can access to corresponding resource (S3)

The trust policy has to be defined that says external resources are allowed to assume this role. 

"Version": "2012-10-17"
"Statement":
- "Effect": "Allow"
"Principal":
"Federated": "www.amazon.com"
"Action": "sts:AssumeRoleWithWebIdentity"
"Condition":
"StringEquals":
"www.amazon.com:app_id": "amzn1.app.007"
"Resource": "*"

any app with name can use this trust policy.

IAM Role

  • is used by AWS resources
  • can be used for federation
  • provides temporary credentials
  • trust policies define who is allowed to assume the role.
IAM Users IAM Roles
Stored credentials Generated credentials
Long term credentials Temporary credentials
External systems and users AWS resources and federation
Less secure More secure
MFA optional  

IAM Policies

Defines what Users and Roles can specifically do. They can be applied to Users, roles and Groups. Policies can be Inline or Managed policies.

Inline Policies are attached directly to users or groups. Managed policies are separate entities and can be attached to more than one User, Role or Groups. This allows policy reusability. 

API / CLI access is through key & secret: AWS_ACCESS_KEY_ID & AWS_SECRET_ACCESS_KEY

different-types-of-iam-policies

In figure, User A will have access to EC2, DynamoDB and S3, but User B will only have group policy, access to s3.

If a User does not have a policy, or only have empty policy, it will have DENY. To do anything with service, we need explicit ALLOW. There can be managed group policy which is allowing corresponding resource usage. In IAM policy, explicit DENY has higher priority then explicit ALLOW.

Permission boundaries for users and roles

  • They define the maximum allowed permissions
  • If a permission boundary is enabled, only explicitly allowed actions are permitted, and denied actions are denied
  • Permission boundaries never grant permissions

Permission boundaries enforce that, even the user assumes roles that may have more freedom, he can not use these due to permission boundaries. If a permission boundary is enabled for a specific user, only actions explicitly listed in permission boundary is possible for that user.

Up to now policies are identity attached policies, which are policies attached to identities or roles. There can also be policies attached to resources.

Resource-based Policies

  • They are attached to a resource.
  • They define which identities can / cannot access the resource

An example bucket policy that allows any object operation is allowed for user avarel on daltons-bucket.

"Version": "2012-10-17"
"Statement":
- "Effect": "Allow"
"Principal":
"AWS": "arn:aws:iam::007:user/avarel"
"Action": "s3:*Object*"
"Resource": "arn:aws:s3:::daltons-bucket"

So, in order to reach a resource, user may have a managed policy allowing him to access this resource, or resource may have a policy allowing this user to have access to him. If these is an explicit DENY somewhere, it will override the rest.

Service Control Policies (SCP)

Much like permission boundaries, they define the maximum boundaries for account. 

It uses AWS organizations which have master account and child accounts. Master account should have “all featured enabled” for this AWS organization. If all features are enabled, we can specify service control policy for the child accounts.

If Service control Policies are enables,

  • only explicitly allowed actions are permitted, and denied actions are denied.
  • SCPs newer grant permissions

Overall Allow / Deny decision will be due to

evaluating-iam-policies

Sample case 1. There is an S3 bucket BucketA, where its resource policy has AllowS3Access. A user, UserA having permission boundary of Allow* + DenyS3AccessToBucketA. Can UserA access to BucketA?

Yes, because resource policies have higher priority then user permission boundaries.

Sample case 2. There is an IAM user UserA in an AWS Account AccountA. AccountA has a organization service control policy of Allow* + DenyS3:DeleteBucket. UserA has managed policy AllowAssumeRole, and permission boundary Allow* + DenyS3AccessBucketA. IAM Role has trust policy of AllowAssumeByIAM User, and managed policy of AllowAllS3Access.

Is this user is allowed to create EC2 instances? 

There is no explicit Allow, so we have an implicit Deny.

Is the user allowed to assume the role?

As the user has a policy to assume the role, and as the role has trust policy that lets user to assume role, yes he can.

Is the user allowed to delete BucketB?

As service control policy says DenyS3DeleteBucket, he can not

Is the user allowed to access BucketA?

No because permission boundaries for this specific user can not let him to access BucketA

Is this user allowed to access BucketB?

Yes he can, there is not an explicit Deny, but there is an explicit Allow in managed policy.


The structure of an IAM Policy has

  • version
  • statement
  • effect
  • action
  • resource
  • principle determines who this statement applies to. used in trust policies & resource based policies. In identity based policy, the principle is always owner, so there is no need to specify

Valid principles are

  • AWS account and root user “AWS”: “arn:aws:iam::007:root” (it specifies every iam user & role in this account)
  • IAM users
  • Federated users (using web identity or SAML federation) “Federated”: “www.amazon.com”, in conditions we can specify the actual application. 
  • IAM roles
  • Assumed-role sessions
  • AWS services
  • Anonymous users (which is not recommended)

Conditions determine when the actions are valid.

Global condition keys are

  • aws:MultiFactorAuthPresent key has value Bool
  • aws:SourceIp has value IP address (Ipaddress / NotIpAddress)

Service-specific condition keys are

  • s3:x-amz-storage-class has value String (StringEquals / StringNotEqualsIgnoreCase)
  • sts:RoleSessionName 
  • sc2:Encrypted

Null Operator checks if a key is present. Useful for

  • assumed roles
  • MFA (check weather MFA key is set)
  • encryption (if you do not case which encryption key there is and only want to check weather an encryption key is there)
"Version": "2012-10-17"
"Statement":
- "Effect": "Allow"
"Action": "ec2:*"
"Resource": "*"
"Condition":
"Null":
"aws:TokenIssueTime": "true"


By default, users don’t have permission to describe, start, stop, or terminate the instances. A way to grant the users such permissions is to attach a tag to instances, and then create a statement that enables them to manage instances with that tag.
The following policy allows users to launch instances using only the AMIs that have the specified tag, “env=dev”. The users can’t launch instances using other AMIs because of the condition element associated to AMI resource. The users also can’t launch into a subnet, as the policy does not grant permissions for the subnet and network interface resources. However, they are allowed to launch EC2 with instance resources, and requires users to specify the key pair project_secret and the security group sg-007. Users are still able to launch instances without a key pair.

"Version": "2012-10-17"
"Statement":
- "Effect": "Allow"
"Action": "ec2:RunInstances"
"Resource":
- "arn:aws:ec2:region::image/ami-*"
"Condition":
"StringEquals":
"ec2:ResourceTag/env": "dev"
- "Effect": "Allow"
"Action": "ec2:RunInstances"
"Resource":
- "arn:aws:ec2:region:account:instance/*"
- "arn:aws:ec2:region:account:volume/*"
- "arn:aws:ec2:region:account:key-pair/project_secret"
- "arn:aws:ec2:region:account:security-group/sg-007"

References

IAM best practices

IAM for AWS Solutions Architect


AWS Solutions Architect Professional – study notes on EC2

Tags

,

Discussions on EC2

Instances in the same AZ can share the same subnet. Subnets can never span multiple AZs. Subnets can have routing tables enabling inter subnet routing in the same AZs.

A M5 Physical host can have m5.2xlarge + m5.xlarge + 2xm5.large virtual hosts. These virtual host will be able to reach eachother with a very minimal delay, since they are on the same physical host.

Every rack will host a bunch of these M5 physical servers. Each will communicate with each other probably with “top of a rack” switch. In EC2 instances between multiple racks probably will go through 3 switches, 2 top of rack switch and one interrack switch. In a singe AZ, there may be multiple physical data centers, which will increase the number in between switches, so increase the latency.

Placement Groups

Placement groups are used to mitigate against latency. A high performance compute solution requires minimum latency and would benefit from instances being physically close to each other. In Another example, a highly available system with many nodes can benefit more distance between the nodes, against hardware failures effecting multiple nodes.

  • cluster placement groups (instances in same placement group will be placed in the same physical rack, latency will be low but chance of failure will be higher)
  • partition placement groups (can span multiple available zones and it will split instances into multiple groups, each of these partitions will be placed on a single physical rack, nodes in partition will have small latency but partitions themselves will be separated from hardware failures)
  • spread placement groups (can span multi availability zones, all single instances are spread out as much as possible)

Instance Families

  • General purpose (A class ARM based, T class burstable (low cpu but an incidental burst), M class mainstream balances cpu and available memory)  
  • Compute optimized (C lass, cpu focused)
  • Memory optimized (R class. main RAM focused up to 768GB, X class upto 3.904GB, U class upto 24.567GB, Z class highest sustained all core frequency up to 384GB)
  • Accelerated computing (P class with GPU, Inf class with inferentia cards, G class with GPU, F class with FPGAs)
  • Storage optimized (I class with NVMe storage, D class up to 48TB of HDD, H class up to 8TB of HDD)

available suffixes are

  • a -> AMD cpu
  • d -> NVMe disc attached
  • g -> Gravition2 ARM cpu
  • n -> faster network up to 100Gbps)

ENA: Elastic network adapter, up to 100Gbps

EFA: Elastic fabric adapter up to 100Gbps, can bypass kernel and talk directly to adapter

Managing and accessing instances through SSM

  • manage instances
  • view status
  • run & schedule documents
  • deploy packages
  • maintain & schedule patch inventory
  • manage automation
  • define maintenance windows

Agents on instances send data to a central SM service.

It requires IAM policy that allows talking to that service

It requires internet or VPC endpoint to able to reach that service

ssm-overview

User can trigger SSM to open a SSH connection with EC2 instance.

ssm-request-websocket-to-ssh

User talks to SSM, which talks to SSM Agent and opens a websocket and returns websocket to user, where user can use this websocket to ssh. This has the following benefits

  • session auditing with cloudwatch logs and S3 (keystrokes and output can be captured and saved to cloudwatch logs)
  • there is no open ports for inbound
  • there is no need for bastian host (works also for private instances)
  • there is no ssh keys to manage

SSM Inventory can

  • periodically scan instances
  • report patch and kernel versions
  • (optionally) report to config
  • (optionally) automate remediation

Hybrid (on-prem) instances

  • centralize patch management
  • centralize operations
  • secure login through SSM
  • run documents

References

EC2 faq

System Manager faq

EC2 tutorial for AWS Solutions Architect

AWS Certified Solutions Architect – Associate

Tags

Associate level of AWS Solutions Architect training is mostly around “AWS Well Architected Framework“. Even if you do not have interest in certification, it provides excellent information about cloud well practices in order to avoid antipatterns. It is  about avoiding architecture mambo jambos, that are so complex and coupled that, result is hard to develop, very hard to test and nightmare to deploy and operate.

solutions-architect-associate

Non-structured notes of this whitepaper will be below but before, here are the primary references;

AWS Whitepaper – Well-Architected Framework

AWS Training course

A wonderful resource on basic of AWS services if you want to go for certification

Takeaways from the whitepaper;

Well architectured framework depends on these five pillars;

  • operational excellence
  • security
  • reliability
  • performance efficiency
  • cost optimization

Architectural decisions are usually tradeoffs between these pillars. As an example, development environment can trade off reliability for reduced cost. If test structure is repeatable and non time critic, spot instances can be used to reduce cost. In well architectured framework, a component is a unit of technical ownership. Why ownership? Because people keep and take care the things they own better. 

General design principles will be:

Use microservices and avoid complexity.

Microservices are small services with well defined APIs that can be deployed independently. This leads to small teams with strong ownership, deploying fast and scaling easily. Microservices appear mostly in the form of API driven, event driven or stream driven structures.

As microservices aim to do one thing, the data requirements are probably more simpler (orthogonal) making them candidate for NoSQL. NoSQL databases are known to scale well.

Difficulties of distributed systems

  • service discovery
  • data consistency
  • asynchronous communication
  • monitoring and auditing

Accordingly CAP theorem, in presence of partition, distributed systems usually trade off consistency in favor of availability and should generally satisfy with eventual consistency.

Message queues provide loosely coupled services without need for service discovery. Simple Queue Service (provides message buffer) and Simple Notification Service (one o many) provides message queues. Applications can use an SQS queue which is registered to an SNS events.

Interactions in a distributed system

  • Make request handling idempotent, meaning that there can be cases that same request is send more than once, which should be handled once. An idempotent token may help here. This ease request retry mechanism in client side considerably.
  • Services have loosely coupled dependencies like load balancers, or message queues.
  • There are three kinds of request processing: Hard real time systems (immediate response) , soft real time systems (response in minutes), or offline processing (batch processing)

Failure handling

  • Use exponential retry with introducing jitter, and a limit in maximum number of retries.
  • Throttle requests if you are not able to process them, and let the clients know this.
  • Implement graceful degradation moving hard dependencies into soft ones.
  • Limit size of buffer queues in order to avoid stale requests the client has already given up.
  • Make services stateless as possible. Services should not require state, or offload state (to dynamodb or elasticache) so that between different client requests, there is no need to for locally stored data in memory or in disc.

Certified Kubernetes Application Developer exam study notes

Tags

,


CKAD exam is all practical ~20 question / 120 minutes exam. Since it is critical to have hand on experience to be successful in this exam, I did some practice, and will share here for reference and in case it may help someone else. 

A useful hint will be kubectl explain, which will be handy in getting kubernetes object fields on fly.

kubectl explain namespace.metadata | less

where updown keys will navigate a line and f &b keys navigate a page. / will search the following pattern

To be familiar with the same Kubernetes client version, check it through exam manual, and install accordingly. For Linux case, this resolves into getting the binary 

curl -LO https://dl.k8s.io/v1.19.0/kubernetes-client-linux-amd64.tar.gz
tar -xvf kubernetes-client-linux-amd64.tar.gz

and copying into /usr/bin/.

kubectl api-resources

will provide kubernetes resources that can be used with kubectl get

In exam Ctrl+C and Ctrl+P will not be available. Replacements will be Ctrl+Insert and Shift+Insert for windows. There will be a notepad available to use as a workspace located in Exam Controls tab.

study notes

all practice questions from study notes combined


References:
official kubernetes cheat sheet
official kubernetes commands

Excellent site for practicing prepared by Liptan Biswas

some more practice questions

CKAD study note for services and networking

Tags

, ,

Kubernetes services

Sample questions

  • Create a pod nginx3 with image nginx and exposing port 80
kubectl run nginx3 --image=nginx --port=80 --expose

get-all-services

  • Create a nginx pod and corresponding service, running on port 80 with label app=backend. Check connectivity through a temporary busybox image.
kubectl run backend --image=nginx --port=80 -l="app=backend" --expose

creating-clusterip-service

kubectl run servicecheck --image=busybox --rm --restart=Never -it -- /bin/sh -c "wget -o- http://10.101.94.246:80"

checking-clusterip-service

  • For the backend pod created above, create another service backend-node of type NodePort. check connectivity within cluster and through node.
 kubectl expose pod/backend --name=backend-node-service --port=80 --type=NodePort

creating-nodeport-service

kubectl run tmp --image=busybox --restart=Never --rm -it --command -- /bin/sh -c "wget -o- http://10.104.45.103:80"
wget -o- http://172.17.0.2:32172

checking-nodeport-service

  • Create a network policy to block incoming traffic to app=backend labeled pods

network-policy


References in kubernetes.io

services

network policies